Understanding Opacity and Blend Modes
ImagiTool Team
Learn what opacity and blend modes do in ImagiTool Photo Editor and how to use them to control layer visibility, contrast, and mood.
Opacity and blend modes are two of the fastest ways to change how layers interact. If you understand these two controls, you can build cleaner composites, softer overlays, and stronger text contrast without extra effects.
This guide stays focused on exactly that: what opacity and blend modes mean, where to adjust them, and when to use common modes.
What You'll Learn
- What opacity changes, and what it does not.
- How blend modes combine a selected layer with layers below it.
- Which blend modes are best for everyday editing goals.

Step-by-Step Guide
Step 1: Select the Layer You Want to Control
- Open Layers from the bottom bar, or press
L. - Click one target layer in the layer tree.
- Keep one layer selected while testing changes so results are easier to read.
Step 2: Adjust Opacity First
Opacity controls transparency from 0% to 100%.
- 100% means fully visible.
- 50% lets lower layers show through.
- 0% makes the layer fully transparent.
Use opacity when your content is correct but visually too strong.
Quick example: If a logo watermark is distracting, reduce opacity until it protects the image without stealing focus.
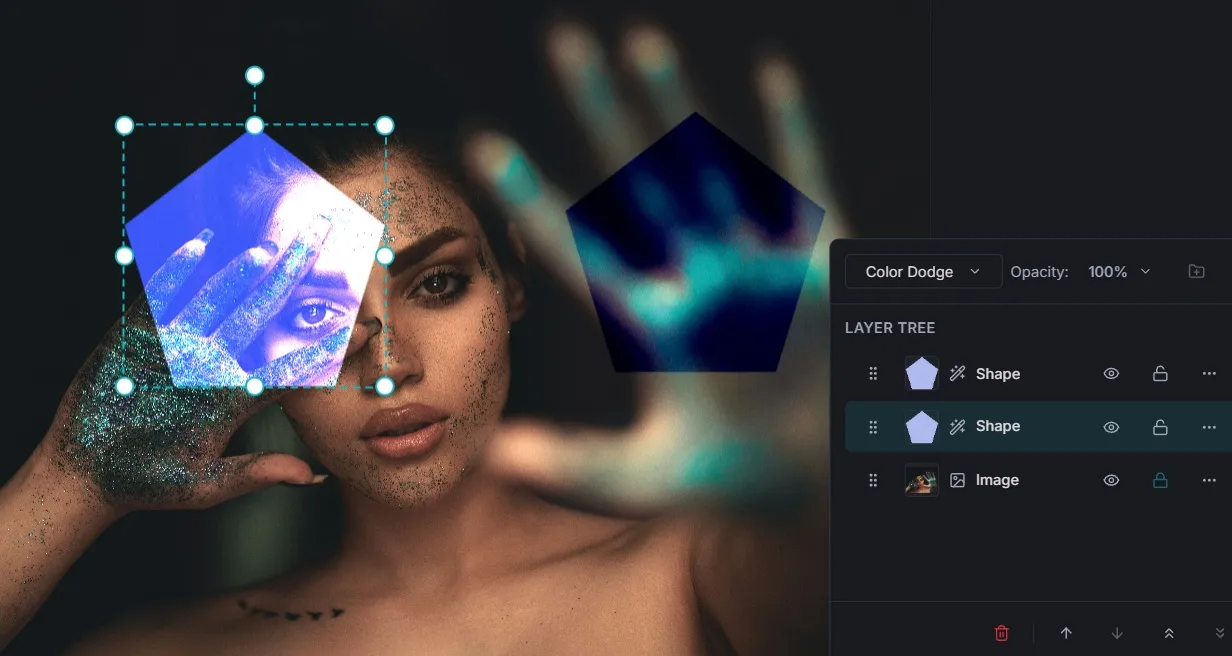
Step 3: Apply a Blend Mode for Interaction
Blend mode changes how the selected layer mixes with the layers underneath.
ImagiTool currently supports these core modes:
NormalMultiplyScreenOverlayDarkenLightenColor DodgeColor BurnHard LightSoft LightDifferenceExclusion
Step 4: Use Practical Mode + Opacity Combos
Start with one of these reliable pairs:
- Multiply + lower opacity for shadows or texture overlays.
- Screen + medium opacity for light leaks and bright haze.
- Overlay + reduced opacity for contrast-rich color styling.
- Soft Light + low opacity for subtle tone shaping.
If a result looks too harsh, keep the mode and lower opacity before switching modes.
Opacity vs Blend Mode: Fast Rule
- Use Opacity when you need less strength.
- Use Blend Mode when you need different interaction behavior.
- Use both when you want controlled, natural-looking composites.
Pro Tips
- Test blend mode at 100% first, then dial opacity down.
- Compare
MultiplyandOverlaybefore committing to darkening. - For text legibility, try
Normalfirst, then use opacity for refinement. - Save time by applying the same method to similar layers in sequence.
Common Issues
Why does my layer look faded?
Opacity is likely too low. Raise it and compare again.
Why did colors shift unexpectedly?
A blend mode like Difference or Color Burn can change hue and contrast strongly.
Why can I not see any blend-mode effect?
Normal does not blend. Also check whether the layer is fully transparent or hidden.
Why does the result look too strong?
Keep the current blend mode and reduce opacity in small steps.