Advanced Replace Color Tool: Brush + Luminosity
ImagiTool's advanced replace color tool is live with brush erase/restore, preserve luminosity, show mask workflow, per-stroke undo/redo, and real-time preview.
Deb Miller
Senior Visual Effects Artist & Photo Editor. Expert in atmospheric overlays, color grading, and digital compositing.

I once had to re-edit 240 product photos at 2 AM because a "simple color swap" destroyed fabric texture and skin brightness. The hue changed, but the images looked fake. Whites went muddy, highlights flattened, and edges looked airbrushed in the worst way.
That failure pushed us to rebuild our replace color tool for real production work, not demo edits. Today we are announcing the upgraded release with an advanced brush workflow, precise mask control, per-stroke recovery, and one feature pro editors ask for constantly: Preserve Luminosity.
If you edit ecommerce catalogs, portraits, brand campaigns, or listings, this release is built for your actual deadlines.
Quick Answer
Yes, ImagiTool now includes an advanced replace color tool with brush erase/restore modes, size-hardness-opacity-flow controls, show mask workflow, brush cursor preview, per-stroke undo/redo, Shift straight-line painting, Preserve Luminosity, and real-time preview.
Start here: Replace Color Tool
Why Replace Color Actually Matters
- Brand accuracy: Product and campaign colors must match approved palettes.
- Natural results: You need color change without destroying brightness and texture detail.
- Faster revisions: Local brush refinement beats restarting full edits.
- Client trust: Real-time preview reduces back-and-forth before delivery.
- Scale readiness: Production workflows need repeatable, recoverable edits.
Ignore this and you pay the usual penalty: fake-looking outputs, manual rework, and missed launch windows.
9 Advanced Replace Color Features Released Today
1. Advanced Brush Refinement for Replace Color
Why it works:
- Lets you refine exactly where replacement should apply.
- Runs on a dedicated brush system designed for selective masking.
- Keeps changes non-destructive while you iterate.
Best for: Complex edges like hair, textiles, logos, shadows, and reflective surfaces.
How to use it: Apply your first replacement globally, then refine with brush strokes where spill, bleed, or missed patches appear.
Personal insight: The fastest editors do broad replacement first and precision brush second. Doing it in reverse usually costs more time.
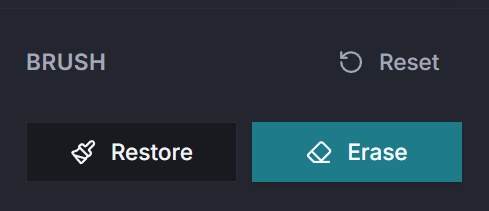
2. Erase and Restore Brush Modes
Why it works:
- "Erase" removes replacement from over-affected areas.
- "Restore" reapplies replacement where you want it back.
- Switching modes avoids destructive restart cycles.
Best for: Portrait touchups, product edge cleanup, and selective recolor with mixed lighting.
How to use it: Use Erase near sensitive zones (skin highlights, specular reflections), then Restore to blend transitions naturally.
Personal insight: Erase/Restore is where good edits become believable edits.
3. Full Brush Controls: Size, Hardness, Opacity, Flow
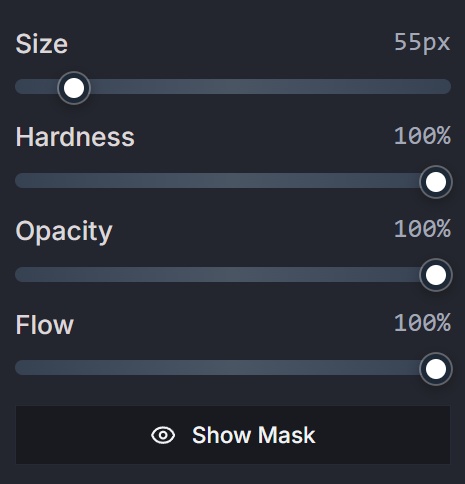
Why it works:
- Size controls coverage speed.
- Hardness controls edge softness.
- Opacity controls stroke strength.
- Flow controls paint build-up behavior over multiple passes.
Best for: Editors who need both fast blocking and subtle feathered transitions in the same image.
How to use it: Start with larger, softer strokes for broad areas, then reduce size and raise hardness for edge definition.
Personal insight: Most over-edited masks come from max hardness plus max flow. Dial both down before you blame the tool.
4. Show Mask Workflow for Safe Refinement
Why it works:
- Makes your active selection visible as a mask overlay.
- Exposes misses and spill immediately.
- Helps you validate brush coverage before export.
Best for: Fine-detail assets, catalog sets, and quality-control passes.
How to use it: Toggle Show Mask on, refine boundaries, then toggle off to verify final blend on the actual image.
Personal insight: Mask visibility is a quality multiplier, especially on images that look "okay" until you zoom.
5. Brush Preview Cursor
Why it works:
- Shows outer brush radius, inner hardness ring, and center target.
- Reflects current brush mode and responds accurately at zoom levels.
- Reduces guesswork when painting near edges.
Best for: Precision touchups on high-resolution product and portrait files.
How to use it: Zoom in on boundaries, track the cursor rings, and paint with intentional overlap for natural transitions.
Personal insight: A clear cursor preview is one of those "small" features that saves massive cleanup time.
6. Per-Stroke Undo and Redo
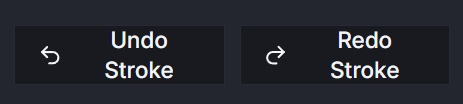
Why it works:
- Undo/redo is recorded at stroke level, not random intervals.
- Lets you recover from one bad pass without losing the whole session.
- Keeps experimentation safe and fast.
Best for: Creative direction rounds and high-pressure deadline edits.
How to use it: Paint confidently, undo the misses, keep the wins, and move forward without restarting.
Personal insight: The difference between fast and slow editing is usually confidence, and confidence needs reliable undo.
7. Shift Straight-Line Brush Behavior
Why it works:
- Draws clean straight strokes between points when Shift is held.
- Improves consistency on geometric regions and product seams.
- Speeds up masking on edges that should remain linear.
Best for: Packaging, labels, architecture, interiors, and hard-edge objects.
How to use it: Click first point, hold Shift, then click target point to place a clean line stroke.
Personal insight: If you are painting straight edges freehand in 2026, you are wasting time.
8. Preserve Luminosity (Keep Original Brightness)
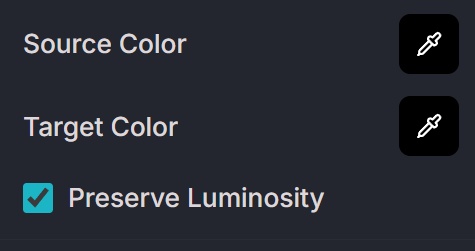
Why it works:
- Keeps the source image brightness relationship intact while changing color.
- Reduces plastic-looking results caused by flat luminance shifts.
- Maintains texture realism in highlights and shadows.
Best for: Skin tones, fabric materials, gradients, and reflective products.
How to use it: Enable Preserve Luminosity whenever your replacement looks "too painted" or unnaturally flat.
Personal insight: This is the one switch that turns an obvious recolor into a believable color correction.
9. Real-Time Preview with Production Responsiveness
Why it works:
- Updates are visible instantly as you tweak sliders and brush settings.
- Reduces trial-and-error cycles by surfacing results immediately.
- Supports practical iteration speed for real-world editing sessions.
Best for: High-volume teams that cannot afford slow adjustment loops.
How to use it: Set target color, tune range/opacity, refine with brush, and validate final look in one uninterrupted flow.
Personal insight: Real-time feedback is not just convenience. It is the foundation of consistent output quality.
How to Do It with ImagiTool (Fast Workflow)
Ready to use these upgrades now? Open ImagiTool Replace Color and follow this sequence:
- Upload your image.
- Pick source color and replacement color.
- Adjust color range and replacement opacity.
- Enable Preserve Luminosity for natural brightness retention.
- Refine with advanced brush using Erase/Restore.
- Use Show Mask for quality control.
- Undo/redo per stroke until edges are clean.
- Export your final output.
For broader editing workflows, read How to Edit Photos Online: A Complete Beginner's Guide and 7 Essential Features of a Browser-Based Photo Editor.
Why This Release Stands Out
Most tools can change color. Far fewer can do targeted replacement with brush refinement, mask visibility, stroke-level history, and brightness-preserving output in one browser workflow.
That combination is exactly what production editors need, and it is still rare even in premium stacks.
For deeper color science context, see Adobe color and blend guidance and Luma fundamentals on Wikipedia.
FAQ
What does Preserve Luminosity do in replace color?
It keeps the original image brightness distribution while applying the new hue, which helps preserve realistic highlights, shadows, and texture.
Can I erase only part of a color replacement?
Yes. Use Erase mode to remove replacement locally, then Restore mode where needed.
Is the brush workflow non-destructive?
Yes. You can refine with mask-based edits and use per-stroke undo/redo during active brush sessions.
Does this work for product photos and portraits?
Yes. It is designed for both, especially when edge precision and natural tonal detail matter.
Is real-time preview available while adjusting settings?
Yes. The tool is built for real-time preview so you can iterate without interrupting your workflow.
Final Take
If your current recolor workflow gives you fake tones, brittle masks, and expensive rework, this release fixes the root causes. The new replace color tool combines advanced brush control with brightness-preserving output so your edits look intentional, clean, and production-ready.
Try the upgraded experience now: Replace Color Tool


