Resize Signature to 140x60 Pixels: Official Forms Guide
Learn how to resize signature to 140x60 pixels for job portals & government forms. Avoid rejections with proper scanning, format selection & optimization tips.
Melanie Garcia
Senior Image Processing Engineer with 8+ years optimizing web performance

Three years ago, I helped a friend apply for 47 government jobs in one month. Every single portal required a signature at exactly 140x60 pixels, under 20KB, JPG format, white background.
We got it wrong the first time. Her signature was rejected 12 times before we figured out the pattern. The issue? She was scanning at low resolution, then upscaling. The result looked blurry enough that automated validators flagged it as "poor quality."
That experience taught me that signature resizing isn't just about dimensions, it's about starting with clean source material and understanding how scanners, compression, and portal validators interact.
If you're preparing a signature for job applications, government forms, banking KYC, professional licensing, or admission portals, this guide will help you get it right the first time. As explained in our complete 140x60 resize guide, exact specifications matter.
Why Signatures Fail Portal Validation
Unlike photos or logos, signatures have unique challenges that make them the most commonly rejected 140x60 pixel images:
Technical Reasons:
- Thin pen strokes disappear: When you shrink a signature to 140x60, fine lines (under 2 pixels wide) can vanish completely.
- Compression artifacts: JPG compression creates "blocky" artifacts around sharp edges, making ink look pixelated.
- Upscaling blur: Scanning at 72 DPI then enlarging to 140x60 creates fuzzy edges that look unprofessional.
- Color contamination: White paper isn't pure white (it's often cream or gray), causing background rejection errors.
Portal-Specific Rules:
- Some portals reject transparent backgrounds (appear as grey boxes)
- Others reject signatures with shadows or backgrounds that aren't pure white (#FFFFFF)
- Many enforce minimum stroke thickness (1.5-2 pixels) for legibility
- Automated validators check for compression quality levels (rejecting over-compressed images)
The Cost of Getting It Wrong:
- Application rejection without explanation
- Wasted time rescanning and resubmitting
- Missed deadlines for time-sensitive opportunities
- Frustration from unclear error messages
How to Resize Your Signature to 140x60 Pixels
Step 1: Scan at High Resolution
Scanning Settings:
- Resolution: 300 DPI minimum (600 DPI for complex signatures)
- Paper: White printer paper with black gel pen (avoid ballpoint)
- Format: PNG initially (convert to JPG later)
- Tip: Sign with thick, deliberate strokes - thin lines vanish at 140x60
Smartphone Alternative: Use document scan mode with natural window lighting. Hold camera parallel to paper to avoid distortion.
Step 2: Clean Up the Image
Before resizing, optimize your scan:
- Increase contrast by 40-50% to make ink pure black (#000000) and background pure white (#FFFFFF)
- Remove dust spots or scanner shadows
- Straighten if tilted using rotate tool
This step is critical - portal validators often reject off-white backgrounds.
Step 3: Resize to Exactly 140x60 Pixels
Use our free 140x60 resizer - don't use generic editors that round dimensions.
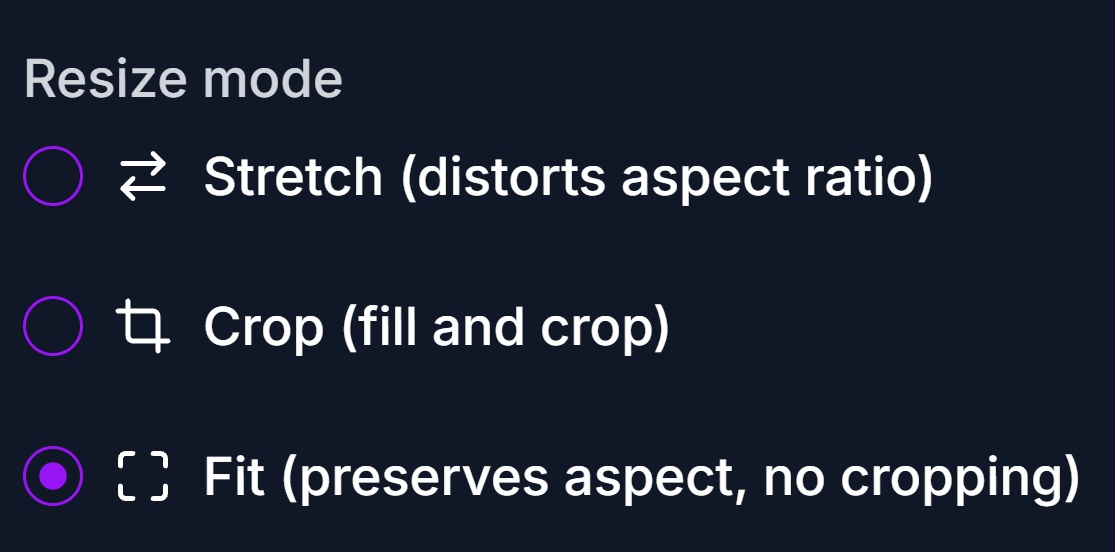
Choose the Right Resize Mode:
Fit Mode (Recommended): Shrinks signature to fit within 140x60 without distortion, adds white bars to fill exact dimensions. Preserves readability.
Crop Mode: Trims excess and resizes. Good for signatures with lots of white space.
Stretch Mode: Distorts to exactly 140x60. Only use if your signature is already long and thin (2.33:1 ratio).
Portal-Ready Settings:
- Dimensions: Exactly 140x60 pixels
- Mode: Fit with center alignment
- Background: White (#FFFFFF) - safest for portals
- Format: JPG at 85% quality
- Target: Under 20KB
Step 4: Optimize File Size Without Losing Quality
Even after resizing to 140x60, your signature might exceed 20KB. Here's how to compress it safely:
Method 1: Adjust JPG Quality
Start at 85% quality and work down:
- 90% quality: 15-25KB (usually too large)
- 85% quality: 12-20KB (sweet spot for most signatures)
- 80% quality: 10-18KB (slight softness, still acceptable)
- 75% quality: 8-15KB (visible compression, use only if desperate)
- Below 70%: Avoid - creates blocky artifacts
How to check: After saving, zoom to 200% and look at pen strokes. If you see "pixelated blocks" around lines, quality is too low.
Method 2: Strip Metadata
Image files contain hidden data (EXIF) that adds 5-15KB:
- Camera model and settings
- GPS location
- Date/time captured
- Editing software used
The resize tool automatically strips this data. If using another tool, look for "Remove Metadata" or "Strip EXIF" options.
Method 3: Convert to Pure Black and White
If your signature is simple (just black ink on white paper), you can convert to 1-bit black/white (not grayscale):
- Reduces file size by 60-80%
- Creates ultra-sharp edges (no grey pixels)
- Warning: Only works for simple signatures - complex ones lose detail
If your signature exceeds 20KB:
- Lower JPG quality to 80-85% (sweet spot for clarity + size)
- Strip metadata (saves 5-15KB) - the resize tool does this automatically
- Ensure pure white background (not transparent - smaller file size)
- Convert to black/white if signature is simple (reduces size by 60-80%)
Zoom to 200% after saving - if you see blocky artifacts around pen strokes, quality is too low.
Step 5: Verify Before Upload
Quick Checks:
- Right-click file > Properties: Verify exactly 140x60 pixels (not 139x60 or 141x60)
- File size under 20KB (aim for 18KB for buffer)
- Zoom to 200%: Pen strokes should be smooth, not pixelated
- Background should be pure white, not cream or grey
Use portal's test upload feature if availabl Cause:
- Fine pen strokes vanished when shrinking to 140x60
- Over-compression created artifacts
- Signature naturally has thin lines
Fix:
- Re-sign using a thicker pen (gel pen or marker)
- Scan at 600 DPI to capture detail
- Slightly increase ink thickness in editor (use "Stroke" or "Dilate" filter)
- Use Fit mode (not Crop) to preserve maximum detail
Error 4: "File Size Exceeds Limit"
Cause:
- Complex signature with gradients or grey tones
- High JPG quality setting
- Metadata not stripped
Fix:
- Lower JPG quality to 80% (from 85%)
- Strip EXIF metadata
- Convert to pure black/white (if signature is simple)
- Ensure background is pure white (not grey or transparent)
Error 5: "Wrong Dimensions"
Cause:
- Tool rounded to 139x60 or 141x60
- Used percentage scaling instead of pixel values
- Canvas size is 140x60 but image inside is smaller
Fix:
- Use a tool with exact pixel control (like our 140x60 resizer)
- Double-check file properties after resize
- Use Stretch mode (if acceptable) to fill exact dimensions
- Avoid tools like Canva that have rounding issues (see our tool comparison)
Portal-Specific Requirements
While most portals use 140x60, some have variations. Always check the specific portal's technical requirements page.
Government Job Portals (SSC, UPSC, State PSC)
Typical Requirements:
- Dimensions: Exactly 140x60 pixels
- File size: Under 20KB
- Format: JPG only (PNG rejected)
- Background: White
- Quality: No visible blur or pixelation
Special Notes:
- These portals have strict validators
- Dimension mismatch will auto-reject
- Keep file size under 18KB for safety
Banking KYC Forms
Typical Requirements:
- Dimensions: 140x60 or 200x100 (varies by bank)
- File size: Under 50KB
- Format: JPG or PNG accepted
- Background: White or transparent
Special Notes:
- More lenient than government portals
- Quality matters more than exact file size
- Check bank-specific requirements (each bank differs)
Professional Licensing Boards
Typical Requirements:
- Dimensions: 140x60 to 200x60 (varies)
- File size: Moderate limits (50-100KB)
- Format: Usually JPG
- Background: White standard
Special Notes:
- May require notarized physical copy too
- Digital signature often needs to match physical
- Quality review may be manual (humans check)
Visa/Passport Applications
Typical Requirements:
- Dimensions: Country-specific (140x60 common for signatures, larger for photos)
- File size: Low limits (10-50KB)
- Format: JPG mandatory
- Background: White mandatory, no shadows
Special Notes:
- Extremely strict validation
- Color depth may be limited to sRGB
- May reject images with any EXIF data
Online Admission Forms (Universities)
Typical Requirements:
- Dimensions: Varies widely (140x60, 110x40, 150x60 common)
- File size: 20-50KB typical
- Format: JPG or PNG
- Background: Flexible
Special Notes:
- Requirements change annually
- Often more lenient validation
- Check current year prospectus
Advanced Signature Optimization Techniques
Technique 1: Two-Pass Resizing
For ultra-sharp results, resize in two steps instead of one:
- First pass: Resize to 280x120 (exactly 2x target size) Government Job Portals (SSC, UPSC): Exactly 140x60 pixels, under 20KB, JPG only, white background. Strict validators - aim for 18KB.
Banking KYC: 140x60 or 200x100 (varies), under 50KB, JPG or PNG accepted. More lenient validation.
Visa/Passport: Country-specific dimensions, 10-50KB limit, JPG mandatory, white background only. Extremely strict.
Universities: Varies (140x60, 110x40, 150x60 common), 20-50KB, requirements change annually. Check current prospectus.
Quick Troubleshooting Tips
Signature looks blurry? Re-scan at 300+ DPI. Never upscale low-resolution images.
Background not white? Increase contrast by 40-50%. Use pure white paper, not recycled/cream.
Too thin/illegible? Use thicker pen (gel pen or marker). Scan at 600 DPI. Apply "Dilate" filter if needed.
File size over 20KB? Lower JPG quality to 80%. Strip metadata. Convert to pure black/white if simple signature.
Wrong dimensions? Use tools with exact pixel control like our 140x60 resizer. Avoid Canva (rounds dimensions - see tool comparison).


