AI Bokeh vs DSLR: Can Digital Match Real Camera Blur?
Can digital tools replace expensive lenses? We compare AI and digital bokeh effects against real DSLR optical blur to help you decide which is right for you.
Deb Miller
Senior Visual Effects Artist & Photo Editor. Expert in atmospheric overlays, color grading, and digital compositing.

I remember the day I almost spent $2,400 on a single lens.
It was an 85mm f/1.2 prime lens - a legendary piece of glass known for creating creamy, dreamy backgrounds that photographers call "bokeh." I had a client who wanted that soft, ethereal look for their product campaign, and I was convinced that my standard kit lens just wasn't cutting it. I had my credit card out, sweating over the checkout button.
Then, a mentor of mine - a veteran VFX artist who had worked on major films - stopped me. "Deb," he said, "Why are you trying to buy physics when you can build the aesthetic?"
He showed me how digital compositing could replicate 90% of that look for 0% of the cost. I didn't buy the lens. The client loved the photos. And I learned a lesson that has defined my career: Tools are just vehicles for a vision.
In 2026, the gap between optical physics and digital computation is vanishing. But the debate rages on. Can an AI bokeh effect really compete with the physics of a DSLR? Is digital blur "cheating," or is it simply the next evolution of photography?
Today, we're putting away the spec sheets and looking at the real-world results. We'll compare the pros, cons, and surprising truths of Optical vs. Digital Bokeh.
Why "Real" Bokeh is So Expensive
To understand why digital tools are disrupting the industry, you first have to understand what you're paying for with a DSLR.
"Bokeh" isn't a filter on a camera; it's a physical phenomenon. It occurs when light rays pass through a lens aperture and hit the sensor. When the aperture is wide open (like f/1.4 or f/1.8), the depth of field becomes incredibly shallow. Everything outside that thin slice of focus turns into soft, spherical blurs.
The Physics of the Price Tag
Creating a sharp subject against a buttery smooth background requires:
- Large Glass Elements: To let in massive amounts of light.
- Precision Engineering: To correct distortions at wide apertures.
- Large Sensors: Full-frame sensors produce shallower depth of field than crop sensors or phones.
That $2,400 lens I wanted? Ideally, it captures a "3D pop" that separates the subject from the background. But it's heavy, fragile, and inflexible. If you shoot at f/1.2 and miss focus by an inch, the nose is sharp but the eyes are blurry. The photo is ruined.
The Rise of Digital Bokeh: AI and Compositing
Digital bokeh doesn't rely on glass bending light. It relies on math.
Broadly speaking, there are two ways digital tools create background blur:
- AI Depth Mapping: The software analyzes the image, guesses which pixels are "foreground" (person) and which are "background" (trees), and applies a blur filter to the background.
- Digital Compositing (Overlay): This is the method used by professional VFX artists and tools like ImagiTool. Instead of just blurring existing pixels, you add new light information - scanned bokeh textures - on top of the image to create depth and atmosphere.
As we discussed in our blend mode technology guide, compositing allows for a level of creative control that even the most expensive lens cannot match.
Round 1: Creative Control
Winner: Digital
With a DSLR, your bokeh is baked into the raw file. Did you shoot at f/1.8 but later wish you had shot at f/4 to get more of the product in focus? Too bad. You have to reshoot.
With digital bokeh, the background blur is an adjustable variable.
- Intensity: You can slide the effect from subtle to dramatic in milliseconds.
- Shape: Don't like circular bokeh? Switch to hexagonal or even heart-shaped light flecks.
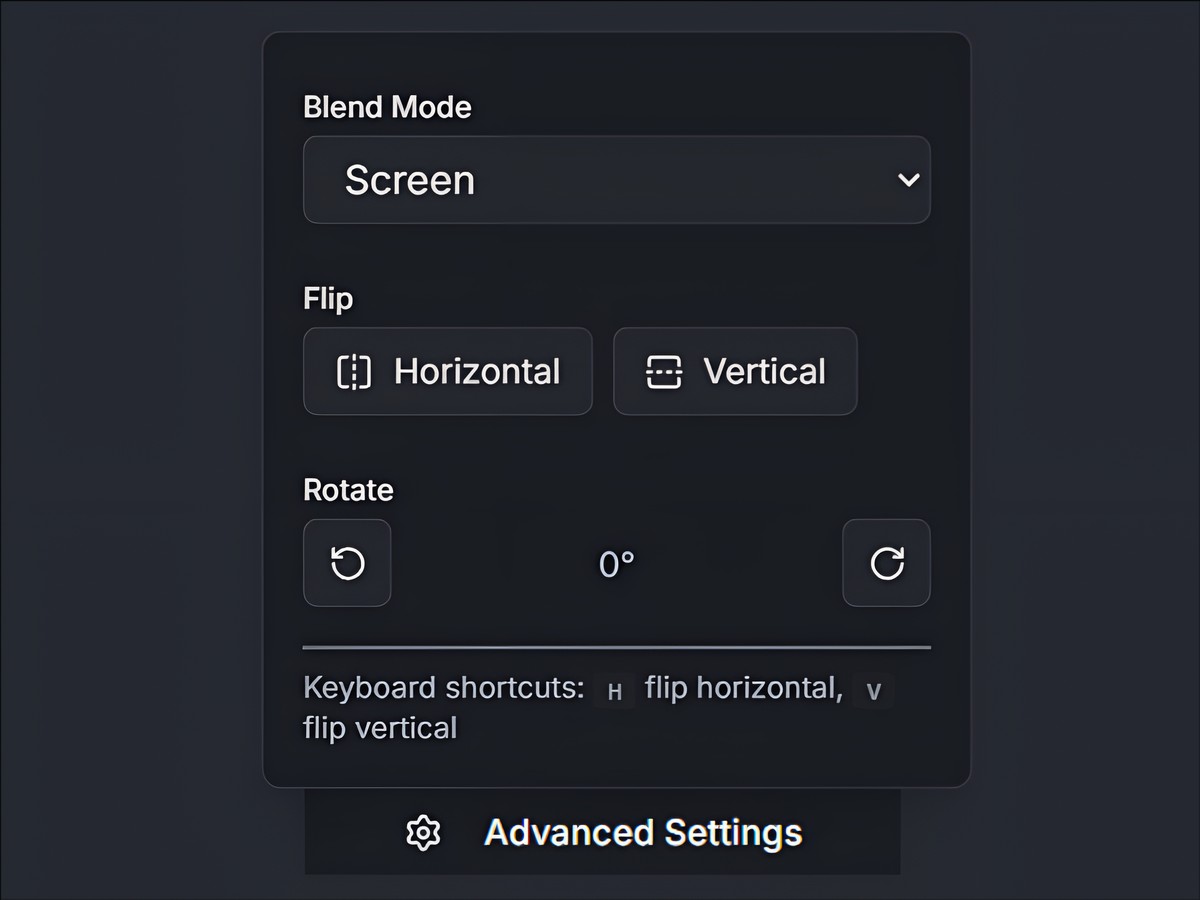
- Placement: In optical photography, bokeh appears wherever the light sources happen to be. In digital, you can move, flip, and rotate the bokeh particles to frame your subject perfectly.
Creating a "perfect" bokeh shot in-camera requires the stars to align: correct distance from subject, correct distance from background, and correct lighting. Digitally, you align the stars yourself.
Round 2: Realistic Depth & Separation
Winner: DSLR (Ideally) / Tie (Practically)
This is the stronghold of the purists. A high-end lens creates a gradual falloff of focus. The ears are slightly blurrier than the nose; the wall five feet away is blurrier than the ears; the mountains miles away are obliterated.
Early "Portrait Mode" on phones failed here because it looked like a cardboard cutout - rigid separation between sharp and blur.
However, modern digital techniques have closed this gap. By layering overlays with Screen blend modes, you create a "light bleed" effect where the background luminosity wraps naturally around the subject's edges. This mimics the optical phenomenon of lens flare and bloom.
If you struggle with "cutout" looking edits, you might be making common digital bokeh mistakes like using the wrong blend mode or excessive intensity.
Round 3: Consistency & Reliability
Winner: Digital
Have you ever tried to shoot outdoor portraits on a cloudy day? Without point sources of light (sunlight filtering through trees, streetlamps), it's very hard to get beautiful bokeh balls. Your background just looks like gray mush.
Digital bokeh brings its own weather.
- Need golden hour sparkles on a rainy Tuesday? Add a Gold Particles overlay.
- Need city night vibes in a dark studio? Add an Abstract light overlay.
Digital tools democratize lighting. You are no longer at the mercy of the sun or the location. You can create a consistent brand aesthetic across all your photos, regardless of where or when they were taken.
Round 4: The "Uncanny Valley" of Generative AI vs. Compositing
Winner: Compositing (ImagiTool)
Here is the nuance that many people miss. There is a difference between "AI Generation" and "Digital Compositing."
Generative AI sometimes "hallucinates." It might try to turn a blurry tree branch into a weird smear, or it might accidentally erase a stray hair because it thinks it's part of the background. This creates that "fake AI look" that feels plastic.
Compositing, which is what we focus on, is different. When you use ImagiTool to apply a bokeh overlay, you aren't asking a robot to guess what the background looks like. You are taking real photographic textures - actual captures of light - and layering them over your image.
Because the overlay itself is "real" (captured optically), it anchors the image in reality. Our brains recognize the physics of the light particles, even if they were added in post-production. It bypasses the uncanny valley because the elements themselves are organic.
For a deep dive on how to add bokeh digitally using these organic overlays, check our pillar guide.
The Verdict: 90/10 Rule
After 15 years in this industry, here is my honest assessment:
A top-tier DSLR with a $2,000 lens delivers 100% realism. If you are shooting a high-fashion cover for Vogue or a billboard ad, you probably want that optical perfection.
Digital Bokeh tools deliver 90% realism for 0% of the cost. For Instagram, e-commerce, websites, blogs, and marketing materials, the difference is imperceptible to the average viewer - if applied correctly.
The question isn't "Is it real?" The question is "Does it feel right?"
When to choose DSLR:
- High-budget commercial shoots where pixel-peeping is guaranteed.
- Weddings where you are capturing hundreds of candid moments and can't edit each one individually (though batch editing helps).
- When you purely enjoy the tactile experience of shooting.
When to choose Digital:
- Product Photography: To add sparkle and premium feel to simple lightbox shots.
- Social Media Content: Where "stopping the scroll" matters more than optical physics.
- Restoring Photos: Adding life to flat images taken on phones or compact cameras.
- Creative Branding: When you need a specific color of light (like lilac or gold) to match a brand palette.
How to Get the "DSLR Look" Digitally
If you want to fool the eye, you have to mimic the physics. Here is the cheat sheet for making digital bokeh look expensive:
- Match the Light Direction: If the sun is coming from the right in your photo, flip your bokeh overlay (using the H key) so the light flares also come from the right. Contradictory lighting is the #1 giveaway of a fake.
- Don't Overdo It: A fast lens might give you creamy blur, but it rarely obliterates the background entirely unless you are shooting macros. Keep your intensity between 40% and 60%.
- Use "Screen" Mode: This allows the light particles to brighten the image without darkening the subject. It simulates how light accumulates on a sensor.
- Layering: Sometimes I use a Natural overlay at low opacity for general texture, and then a Gold Particles overlay at higher opacity for specific highlights.
Ready to Test the Theory?
You don't need to rent a lens to see the difference. Take a flat photo - maybe a selfie or a product shot on your desk - and bring it into ImagiTool.
Try applying the Natural bokeh preset. Adjust the intensity until it just kisses the edges of the frame. You'll see the image transform from "snapshot" to "portrait."
Physics is expensive. Creativity is free.
