Sharpen Product Photos: E-Commerce Image Quality Guide
Boost e-commerce conversions with crisp product photos. Learn optimal sharpening levels for jewelry, clothing, and electronics to build trust and sales.
Melanie Garcia
Senior Image Processing Engineer with 8+ years optimizing web performance

I used to consult for a watch brand that couldn't understand why their $1,200 timepieces weren't converting online. Their photography budget was $10,000 per quarter. The lighting was perfect. The styling was elegant. But their conversion rate was 1.2%, while competitors were hitting 3-4%.
I opened one of their product images and zoomed to 100%. The watch face was soft. You couldn't read the numbers on the dial. The texture of the leather strap looked like a watercolor painting. They'd spent thousands on photography but skipped the final 5% that makes images look professional: sharpening.
I spent 30 minutes sharpening their top 20 product images. Their conversion rate jumped to 2.8% within two weeks. That single afternoon of work translated to roughly $47,000 in additional quarterly revenue.
Sharpness isn't a technical detail. It's a trust signal. When a customer can see the stitching on a handbag or the engraving on a ring, their brain registers "quality." When details are soft, their subconscious registers "cheap" - even if the product costs $2,000.
Why Sharpness Directly Impacts Conversions
E-commerce photography has one job: answer the question "What am I really getting?" before the customer can touch the product.
Research from the Baymard Institute shows that 56% of cart abandonments happen because customers "couldn't see enough product detail." Not price. Not shipping costs. Detail visibility.
The Psychology of Clarity
Our brains process sharp images as:
- Higher quality (even when comparing identical products)
- More trustworthy (we associate blur with deception)
- More expensive (premium brands = premium presentation)
Conversely, soft images trigger subconscious red flags:
- "Is this a stock photo?"
- "Are they hiding flaws?"
- "Is this a dropshipping scam?"
As covered in our complete sharpening guide, the right level of sharpening makes edges pop without creating artifacts - and in e-commerce, those edges are your selling points.
The 50-75 Rule for Product Photography
For most product categories, the sweet spot is 50-75 on a 0-100 sharpening scale. This range enhances fine details (texture, text, edges) without introducing halos or unnatural contrast.
Here's why this range works for products:
- Below 50: Details remain soft. Customers zoom in and see mush.
- 50-60: Clean, professional enhancement. Safe for most products.
- 60-70: Strong detail for high-value items. Jewelry, tech, luxury goods.
- 70-75: Maximum detail for tiny features. Use sparingly.
- Above 75: Risk of halos. Only for specific technical applications.
If you're deciding between tools, check our 7 Best Image Sharpeners comparison to find one with precise control in this critical range.
Category-Specific Sharpening Guidelines
Not all products need the same treatment. Here's the breakdown by category.
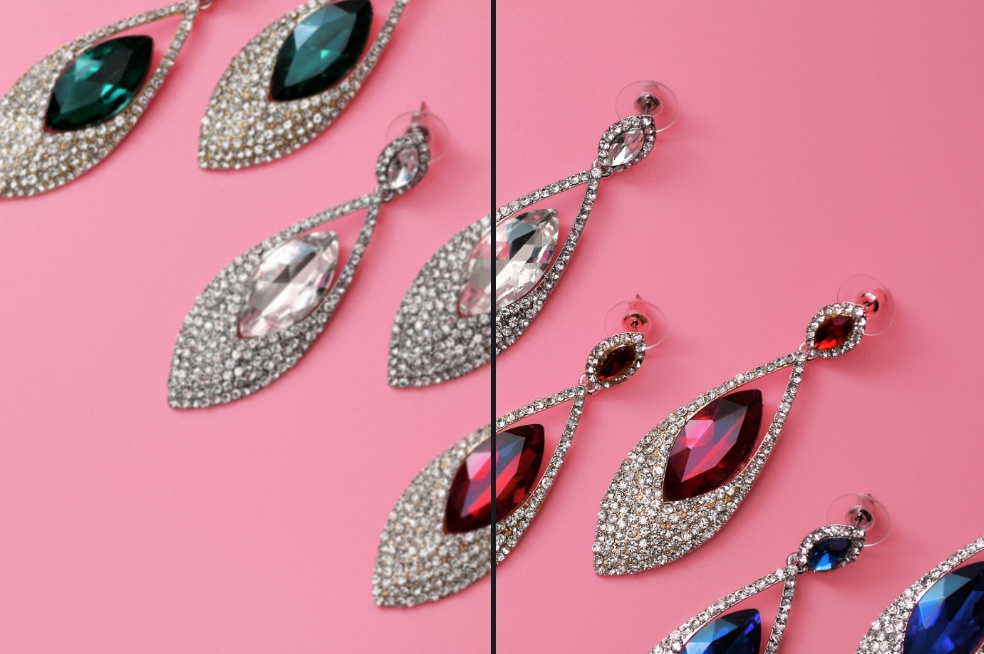
Jewelry & Watches (60-75)
Why it matters: Customers need to see facets, engravings, and metal texture. Luxury items demand maximum detail.
Sharpening Level: 60-75
- Fine Jewelry (diamonds, gold): 65-75
- Costume Jewelry: 60-65
- Watches: 65-70
Key Details to Enhance:
- Gemstone facets catching light
- Brand engravings on clasps
- Texture of metal (brushed vs. polished)
- Dial printing on watches
Pro Tip: Zoom to 200% and check that gemstone edges are crisp but not haloed. If you see white outlines around diamonds, you've gone too far.
Clothing & Fabric (40-55)
Why it matters: Fabric texture sells quality. Customers want to see weave, stitching, and material density.
Sharpening Level: 40-55
- Casual Wear (cotton, denim): 45-55
- Formal Wear (wool, silk): 40-50
- Athletic Wear (synthetic): 50-55
Key Details to Enhance:
- Fabric weave (linen texture, denim twill)
- Seam stitching and topstitching
- Label text and care tags
- Button and zipper details
Pro Tip: Be careful with skin tones in flat lays. If a model is wearing the item, use a lower level (40-45) to avoid harsh skin texture.
Electronics & Tech (55-70)
Why it matters: Tech customers are detail-obsessed. They zoom in to read ports, buttons, and brand logos.
Sharpening Level: 55-70
- Smartphones/Tablets: 60-65
- Laptops/Monitors: 55-60
- Accessories (cases, cables): 60-70
Key Details to Enhance:
- Port labels (USB-C, HDMI)
- Screen resolution (if powered on)
- Button engravings
- Logo sharpness
Pro Tip: Tech products photograph well with high sharpening. The clean lines and hard edges can handle 65-70 without looking over-processed.
Food & Consumables (45-60)
Why it matters: Food needs to look appetizing, not clinical. Over-sharpening makes textures look dry.
Sharpening Level: 45-60
- Packaged Food: 50-60 (show label clearly)
- Fresh Food (for recipes/lifestyle): 45-50 (maintain juiciness)
- Baked Goods: 50-55 (texture without dryness)
Key Details to Enhance:
- Ingredient text on labels
- Texture contrast (crispy crust vs soft interior)
- Condensation on beverages (freshness signal)
Pro Tip: If the product looks dry or unappetizing after sharpening, you've gone too far. Back off by 5-10 points.
Home Goods & Decor (50-65)
Why it matters: Customers judge quality by material finish. Wood grain, fabric weave, and metal polish must be visible.
Sharpening Level: 50-65
- Furniture (wood): 55-65
- Textiles (rugs, pillows): 50-55
- Ceramics/Glass: 55-60
Key Details to Enhance:
- Wood grain patterns
- Fabric texture and weave
- Surface finish (matte, gloss, brushed)
Platform-Specific Requirements
Different platforms have different image standards. Here's how to optimize for each.
Amazon
Main Image (White Background):
- Sharpening: 55-65
- Amazon compresses images aggressively. Sharpen slightly higher to compensate for compression softening.
- Requirement: Must show product only, no lifestyle context.
Secondary/Lifestyle Images:
- Sharpening: 50-60
- These can include context (person holding product, usage scenario).
- Focus sharpening on the product, not the background.
Pro Tip: Amazon's algorithm favors high-quality images. Sharp, clear photos correlate with better organic search placement.
Etsy
Main Listing Photo:
- Sharpening: 55-65
- First impression matters. Etsy buyers zoom heavily before purchasing.
- Handmade items benefit from detail visibility.
Lifestyle Shots:
- Sharpening: 45-55
- Keep the focus on the product; let the background stay soft for depth.
Pro Tip: Etsy's search favors shops with high-quality images. Invest time in sharpening your top 10 products first.
Shopify/WooCommerce (Your Own Store)
Product Pages:
- Sharpening: 55-70 (you control the compression)
- You have more control than on Amazon. Use it.
- Test on mobile devices (where 60%+ of traffic comes from).
Collection Thumbnails:
- Sharpening: 50-60
- Thumbnails are small; too much sharpening creates noise.
Pro Tip: Run A/B tests. Swap sharpened vs. unsharpened images for your top 5 products and track conversion differences.
The Workflow: When and How to Sharpen
Sharpening should always be the last step. Here's the proper sequence:
1. Shoot/Source the Image Use the highest quality source possible. You can't sharpen detail that doesn't exist.
2. Edit (Color, Brightness, Contrast) Adjust exposure, white balance, and color correction first. Sharpening amplifies whatever is there, including bad color.
3. Crop and Resize Resize to your final display size. Sharpening at 6000px wide, then shrinking to 1200px, wastes quality.
4. Sharpen Apply sharpening based on category guidelines above. Use a tool with real-time preview so you can dial in the exact level.
5. Export Save in the highest quality your platform allows. JPEGs at 85-95% quality strike the balance between file size and sharpness retention.
Common Mistakes (And How to Avoid Them)
Mistake 1: Sharpening Before Resizing
If you sharpen a 5000px image then resize to 1000px, the sharpening effect is partially lost in the downscaling. Always resize first, then sharpen.
Mistake 2: Using the Same Settings for Every Product
A watch needs 65. A sweater needs 45. Don't batch-apply one setting to your entire catalog.
Mistake 3: Not Checking on Mobile
73% of product views happen on phones. That halo invisible on your 27" monitor is glaring on a 6" screen. Always preview on mobile.
Mistake 4: Ignoring File Size
Amazon has a 10MB limit. If your sharpened image exceeds it, you'll be forced to compress, which softens the image again. Balance sharpening with file size.
The 5-Second Test
Here's how to know if you've nailed it:
- Open your product image.
- Zoom to 100% (actual pixels).
- Look at the most important detail (logo, texture, text).
Ask yourself: "Can I see it clearly, or does it look like a painting?"
If it looks like a painting: Sharpen more. If you see white halos around edges: Sharpen less. If it looks crisp and clean: You nailed it.
Your Action Plan
Don't try to sharpen your entire catalog today. Start with your top performers:
Week 1: Sharpen your 10 best-selling products. Measure baseline conversion rates. Week 2: Monitor analytics. Look for conversion lift, reduced bounce rates, or increased time-on-page. Week 3: If you see improvement, expand to your top 50 products.
E-commerce is a game of small margins. A 0.5% conversion lift on a $500,000/year store is $2,500 in annual revenue - for an afternoon of work.

